This is one of a series of posts on “Demystifying the Magical World of DevOps”
Most of the content here is not applicable if you are going with a cloud-based solution.
I’m a huge fan of virtual machines. For those not familiar, VMs are essentially a way of running a completely independent OS inside of another. (Note that this shouldn’t be conflated with containers, which are similar but share underlying components with the host OS. More on that in a future post in this series.)
Hyper-V is a hypervisor created and distributed by Microsoft. In it’s simplest sense, a hypervisor is simply a platform for running virtual machines. I’m a huge fan of Hyper-V for a variety of reasons, some technical and some logistical, but I do feel compelled to point out that there are other solutions out there, such as Oracle’s VirtualBox and a variety of options made by VMWare. Today though, let’s just talk bout Hyper-V.
So, why do I like virtual machines?
I’m glad you asked.
- It allows me to run multiple things on the same physical machine. That means the machine you’re using typically needs to be more peformant and have more memory than you would need for a given application. Because you can put multiple VMs on the same physical machine, however, it’s typically more cost (and space) effective to by one high-end machine than three average machines.
- It allows me to easily backup and/or replicate the complete state of my VM on a different physical machine. This means that I can configure it such that a hardware failure on my primary server causes a secondary instance to come online, resulting in minimal downtime. Furthermore, if my replication is at a different site than my primary instance, this can even give you redundancy in power failure scenarios.
- Less applicable for this use case, but generally useful, I can take snapshots of a given configuration. This means that I can make a ‘base’ image, then have different snapshots for all of my different software stacks. This leads to minimal ‘cross-talk’ between projects I’m working on. It also means that if I want to try something risky (installing beta software, for example), I can easily make a ‘restore point’ to go back to.
Why do I like Hyper-V?
- It’s fully featured, and is freely available.
- It’s widely used in the industry. This means rigorous testing and extensive documentation (both by Microsoft and by third-parties).
- It’s a Type 1 hypervisor, which means that your VM is closer to ‘bare metal’ than a Type 2 (such as VirtualBox or VMWare Workstation/Player).
How to get Hyper-V
Alright, now that we’ve established the virtues of VMs and Hyper-V, let’s get more specific. You have a few options if you want to user Hyper-V:
Windows 10 Professional
Windows 10 Pro can be configured as a Hyper-V server. This means that you can run your VM on your dev machine, from anywhere, without a dependency on VPN (or even an internet connection, for that matter). This option requires you to have a valid Windows 10 Professional license.
Windows Server
Modern versions of Windows Server allow you to enable a Hyper-V server as well. It offers many of the same advantages as Windows 10 Professional, as well as all the features of Windows Server. This scenario also gives you the option of interacting with your VM on the same physical machine that is hosting it. This option requires you to have a valid Windows Server license.
Hyper-V Server
Hyper-V Server isn’t for the faint of heart. It’s a barebones OS, whose only purpose is to run VMs. That means a command line interface and no ability to interact with your VMs from the host’s console. BUT, if you’re only goal is to host VM’s it means you have more net resources available (since you don’t have all the overhead of a GUI and general purpose features of Windows 10 floating around unused but consuming memory/clock cycles).
Also, this version is a free download, with no purchase required. (Note that you are required to have a valid license for any VMs that run on it. The same is true of the first two options, but in some cases the base OS license also includes a single VM license. Check with Microsoft for details on that.)
Enough already! Get to the point!
So, the plan of attack I’ll lay out includes configuring a Hyper-V Server instance (no GUI) that we will immediately use to host an Ubuntu Server 18.04 instance, and eventually a Windows 10 instance.
Things you’ll need
- A physical machine (the host). For this post, we’re going to use a laptop that we had lying around. It’s relatively modern i5 with 8 gigs of ram. It will work for our initial purposes (the Ubuntu Server VM), but we’ll need to migrate once our actual server gets here and we want to run a build machine.
- The Microsoft Hyper-V Server 2019 .iso file: (https://www.microsoft.com/en-us/evalcenter/evaluate-hyper-v-server-2019)
- The .iso file for your operating system of choice to be used on the VM(s)
- A distinct Windows 10 Pro machine to interact with the Hyper-V server.
- A USB flash drive (in some cases)
Procedure
Install Hyper-V Server
If your new server already has a Windows install on it, you can simply mount the .iso file and run the setup.exe; if your server doesn’t, then you will need that USB drive.
If installing from USB, simply extract the contents of the .iso to the flash drive (using your Windows 10 machine), and then insert it in to the server’s USB port. In my experience, if you have a UEFI BIOS it should show up in the boot menu as a bootable device and allow you to start the install.
Depending on whether you are installing from USB or the setup.exe, things diverge a bit, but the general workflow is that you’ll get a license agreement and either be asked what you want to keep (if doing an install via setup.exe) or asking you to choose between a repair/new install (if loading from USB).
Choose the appropriate partitioning scheme when prompted. I typically just nuke the entire drive and let it start fresh with the resulting un-allocated space, but your requirements may vary.
After you kick off your install, be patient and let it do it’s thing. It may take several reboots, but eventually you’ll boot to a screen asking you to change the administrator password. Do so.
Worth noting, when I initially booted, it didn’t detect a network adapter. Something about my system is a special snowflake and I had to manually install the driver using the command line. I used the instructions here, which are very dated but seemed to work fine: https://ortuno2k.wordpress.com/2011/02/11/installing-drivers-on-windows-server-core/
Also worth noting, you’ll need to use a hardwired LAN connection; there’s no WiFi support in Hyper-V Server.
You’re in!
Now, you should be looking at a screen similar to the following:

At this point you have a few options. Note that you can enable remote desktop. You should be able to do the remainder of the following from your Windows 10 machine over RDP, but I was seeing a weird issue where it would hang on me when I did so. YMMV.
The first thing I typically do is go to Remote Management settings and enable ping response. Out of the box, the default is for the Hyper-V server to ignore ping requests.
Next I’ll change the computer name to something reasonable and join the domain. This is straightforward, but you’ll need to have the machine added to the domain under the desired name, and you’ll need someone with domain-level admin rights for the machine to finish the process. (You’ll be prompted for a username and password.) I’ve read that you can accomplish all of this without joining a domain, but I’ve never been able to do so.
Finally, add yourself and any other relevant accounts as a local administrator.
Preparing for use
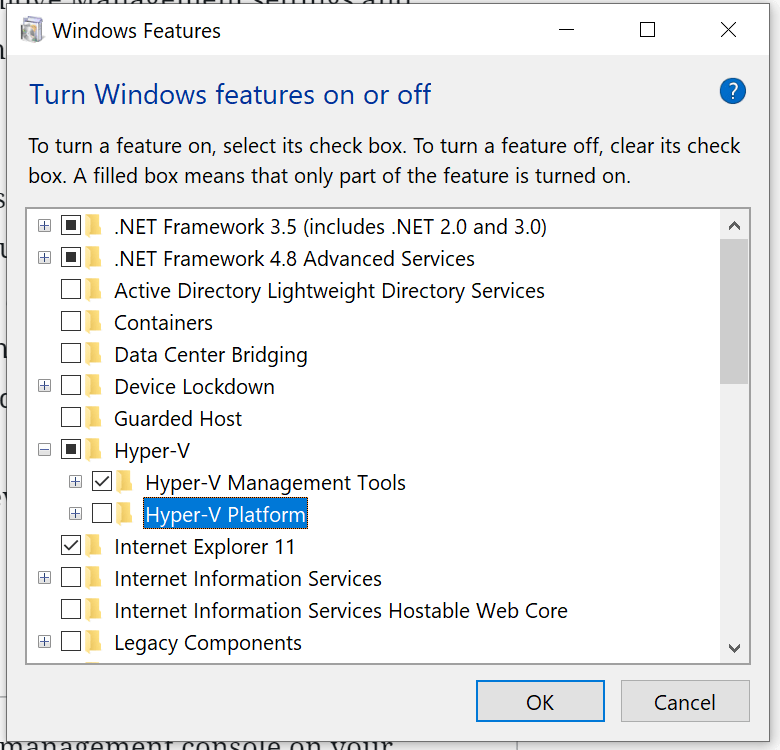
Now you’ll need to enable the Hyper-V management console on your Windows 10 machine, if you haven’t already done so. You can do this using the “Turn Windows Features On and Off” dialog. Hyper-V Platform is used when you wish to run a Hyper-V server on the local Windows 10 machine, and is not needed to accomplish the remainder of these tasks.
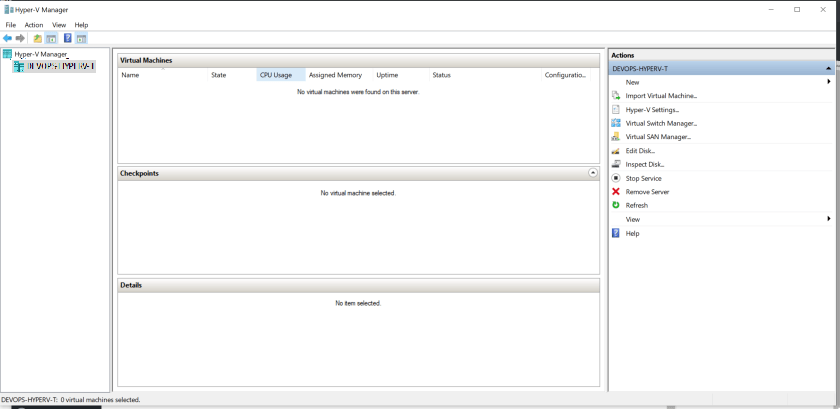
Once the management console is installed, open it via the start menu. You should be greeted by something resembling the following:

The next step is to add the Hyper-V server to the management console. You do this by clicking “Connect to Server” on the right. You should be greeted with the following dialog:

Note that in my experience you need to use the DNS name and not the IP of your Hyper-V server. If you’re not added to the server as an admin, you’ll need to connect as a different user (see checkbox). You should now have the following screen available:
The last step for now is to add a virtual switch. This is how your VMs will connect to each other (and the outside world).

You’ll have the option to create an external, internal or private switch.
- An external switch essentially acts as a bridge, allowing any VM connected to it to access any other devices on the switch as well as anything accessible via the NIC it’s associated with (such as the internet).
- An internal switch provides connectivity between to the VM and host, as well as among any VMs connected to it, but not any external networks. This is typically more useful when the host is a Windows 10 or Windows Server machine where you’ll be doing work locally.
- A private switch allows any VMs connected to it to communicate among themselves, but doesn’t allow any communication with the host or external NIC.
We’re only interested in an external switch for now:

Creating a VM
Now we’re ready to create our first virtual machine. To do so, use the “new” flyout on the right side and select “Virtual Machine.”

This will display a dialog box that’s relatively straight-forward and guided.

A few notes:
- I typically use a Gen 2 machine and Dynamic Memory allocation
- I’d recommend you’ve already defined an external switch (to get updates as part of the install process)
- Note that virtual hard disks are expanding, and can be made given a larger capacity than the actual volume it’s being stored on. Bad things can happen when you do this. Trust me.
- Note that when installing your OS from an .ISO it must be located on the remote machine or accessible via a network share (by UNC Path). The network share needs to be readable by a non-authenticated account, which was inconvenient for me, so I used robocopy from the network share (though in retrospect I could have easily done it with a flash drive).
- Create a share on my local machine that I had access to, and place the relevant ISO in it.
- Log in to the Hyper-V Server using my domain account.
- Create and CD to the desired destination directory on the server.
- Run the following command:
robocopy \\mymachinename\shareName . ubuntuServerImageName.iso
After you click ‘finish’ it will take a few moments to create the machine. Following that you’ll need to change a setting. Under the “security” menu, change the Secure Boot template to the appropriate option: https://docs.microsoft.com/en-us/windows-server/virtualization/hyper-v/learn-more/Generation-2-virtual-machine-security-settings-for-Hyper-V?redirectedfrom=MSDN
You may also want to enable TPM if you intend to use encryption. (More on that in the next post.)

You can now boot the machine by double clicking on the machine and using the ‘Start’ button on the resulting dialog. Proceed with OS installation as if you were on any other machine. Note that the VM will have no awareness of the host it’s running on, except for resources exposed via the network.
Next time we’ll discuss Ubuntu Server and disk encryption.